Quick Start
If you are looking to integrate PNM System into your game rapidly then this guide will help you figure out how to "Migrate" the PNMS Demo projects over to your project. I do not suggest using the Unreal Engine Migraiton Tool for this. The Demo projects are encapsulated as plugins to make this easier but this does mean that to use them you will need to upgrade your project to a C++ project and be able to compile C++. There are many tutorials out there on how to use Visual Studio Community or another IDE to compile and use your project.
The upside is if you want to keep your project blueprints only then you do have an option to convert your project to C++ first, add the plugins, move their content into your project, then convert the project back to Blueprint Only. Well discuss how to do this later on.
There are three possible routes for Migration you can take. The Blueprint Plugin Migration, the Blueprint Core Migration, or the Advanced System Migration. This guide will go over each of these.
Migration Options
I highly suggest implementing the Mounting System from the ground up in your own project as every project is very different. Knowing how to implement the system allows you to better debug things when they break. However not everyone has the time or technical knowledge to do such things. These Options provide a way to make the PNM System more accessible.
There are three different methods quickly integrating the Demos into your project and which you use depends on your experience level and what you need for your project.
Option 1 - Blueprint Starting Point
This option uses the two Mounting System Tutorial Core (MSTC) and Mounting System Tutorial (MST) Plugins together which implement the entire system in only blueprints. This option can be used if you are just starting your project. It provides a Basic implementation of the mounting system plus visual assets such as Manny and Quinn Characters plus a basic mount to use. However this system does not implement any mounting and dismounting animations or move to target location subsystems.
Option 2 - Minimalist Blueprints
This option uses only the Mounting System Tutorial Core (MSTC) demo plugin implementation which has no visual assets but is done completely in blueprint. Generally this would be used if you already have a project that you are working on with plenty of assets to use as your Rider and Mounts. If you just need the core mounting system to quickly implemented in your game, this is your short cut.
Option 3 - Advanced Mounting System
This option uses the Advanced Mounting System (AMS) plugin and is a fully featured mounting system complete with basic animations and move to location logic. Generally you would use this as a guide to implement it in your own game but you can use it as a base for your project. This project leverages C++ classes and Blueprints which are all encapsulated in the plugin itself so that it can be dropped into your project for use.
Update to a C++ Project
If you are using a Blueprint only project you will need to upgrade it to a C++ project at least temporarily. You will need Visual Studio or some other IDE setup to compile code for Unreal Engine. This guide will not guide you through how to do that, there are many guides and videos out there on how to do that. The easiest method of updating the project to C++ is to load up the editor and add a new C++ class. Traditionally the you simply add GameModeBase to your project. Once that is done:
- Open your Project in the Editor
- Add a new GameMode Class to your project
- Go to your .uproject in your folder directory
- Right click the .uproject file
- Choose "Generate Visual Studio Project Files"
- Double Click on the SLN to open it.
Viewing Plugin Content
If you are new to using plugins in order to view and use Plugin Content you must enable it in the Editor.
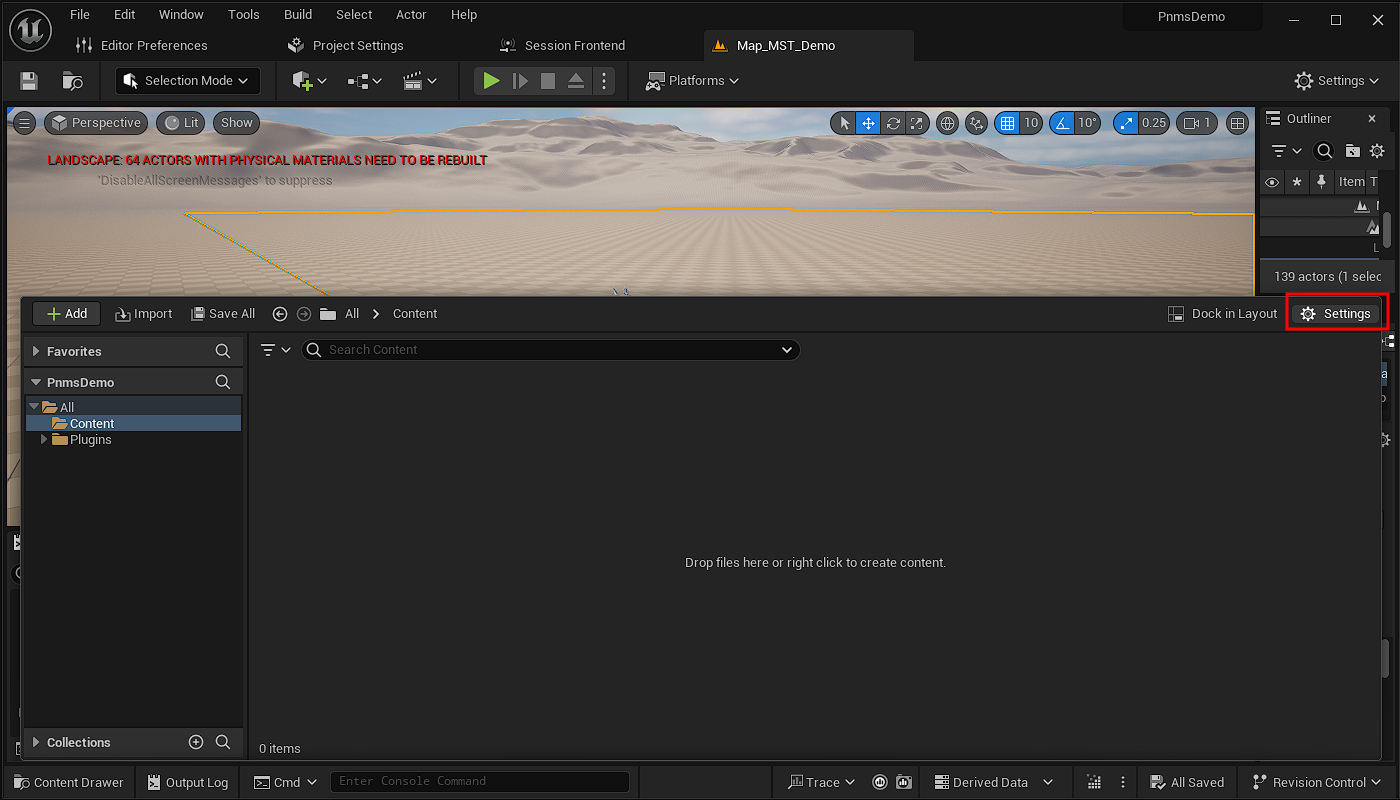
In the editor Open up the Content Drawer.
On the right hand side of the Content Drawer click the "Settings" Button

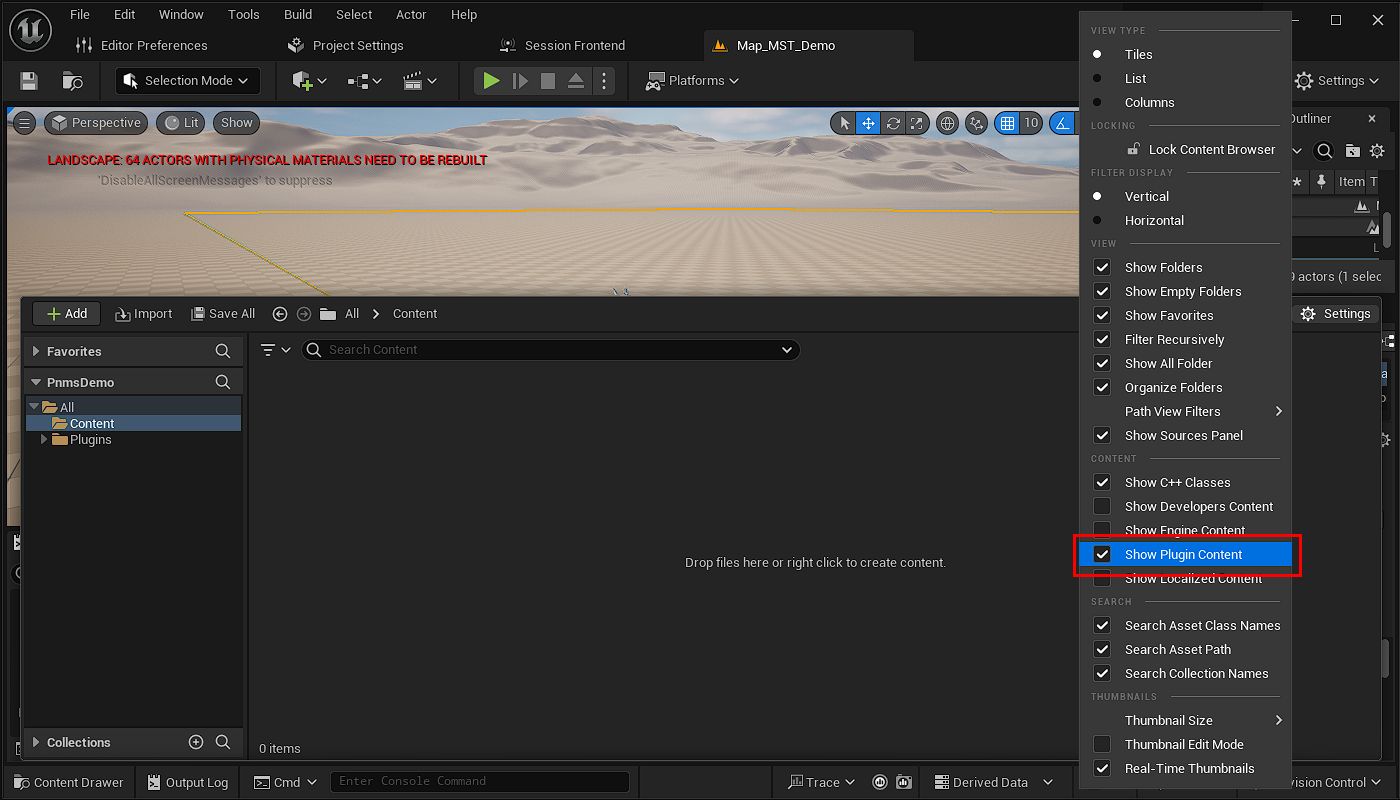
In the Settings tab look for the option "Show Plugin Content" and check it on.

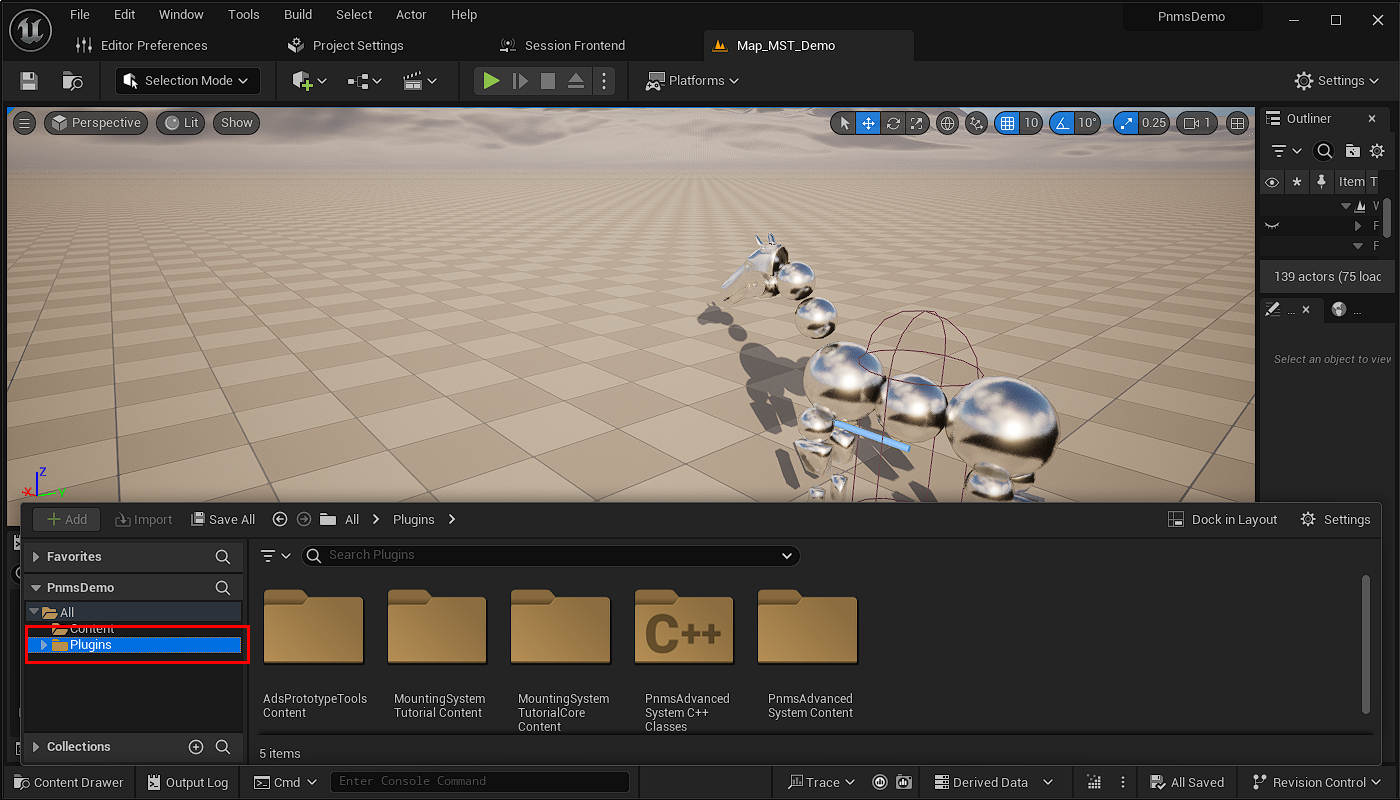
Now in the Editor Content Window you should see the Plugins folder appear.

Option 1 - Blueprint Starting Point
If you are looking for a basic implementation of the mounting system and/or running a blueprint only dev game at the moment then this is where you want to begin. This will give you a fully functional mounting system with blueprint base classes already setup that you can parent your games various blueprint classes to or vice versa.
In the Demo Project find the folder Plugins/AsadeusStudios and copy the AdsPrototypeTools Plugin folder over to your projects Plugins folder. Feel free to create subfolders. This Plugin contains the Basic Interaction System built to use for the Demo.

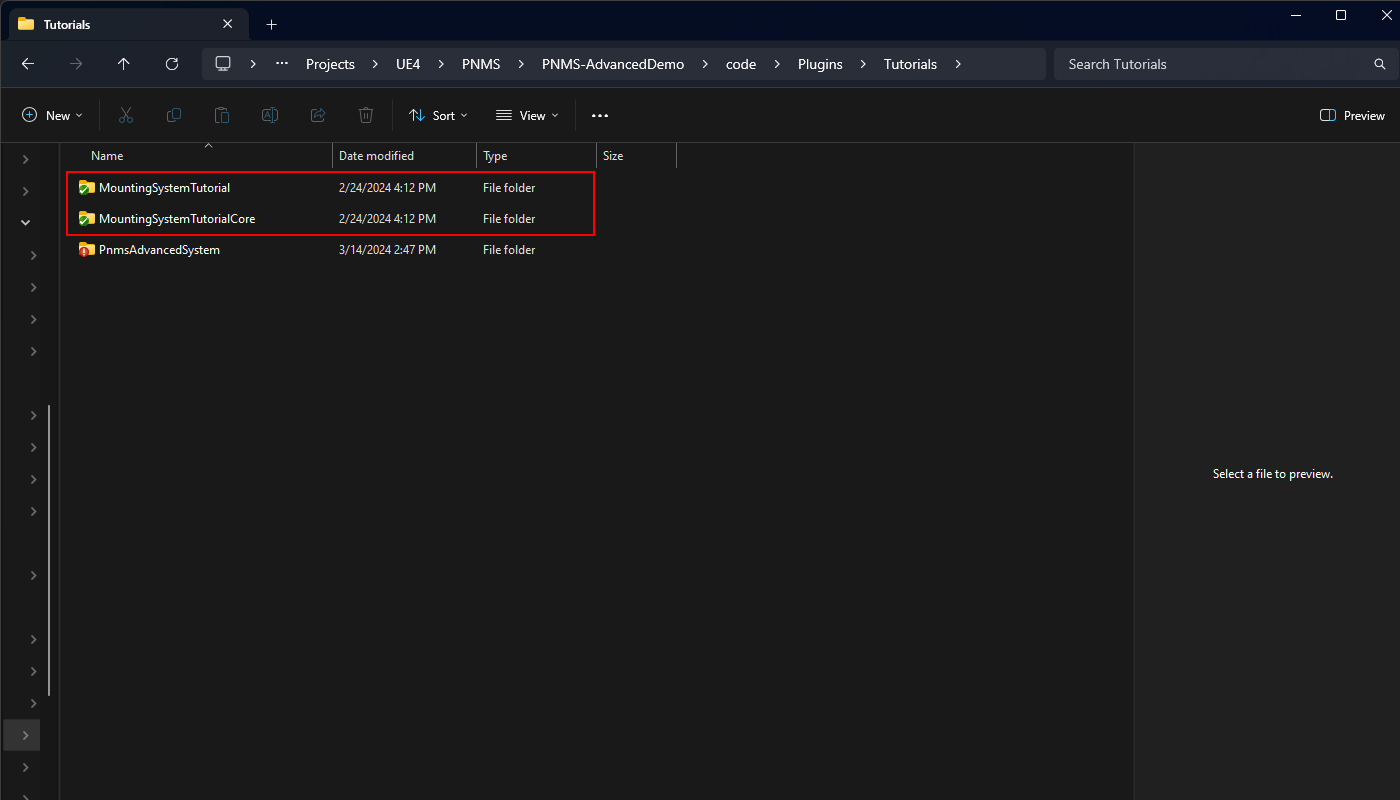
Next go to the Demo Project and find the folder Plugins/Tutorials and copy both the MountingSystemTutorialCore plugin and the MountingSystemTutorial plugin. Copy both of these plugins into your projects Plugins Folder. Feel free to create any subfolders you need. These two plugins form the Full Demo of the PNM System fully implemented in Blueprints.
Go to your projects root folder and right click on the .uproject and select "Generate Visual Studio Project Files"
Under the plugins folder in the Content Drawer you should now see the "MountingSystemTutorialCore Content" and "MountingSystemTutorial Content" folders which contain all the blueprint base classes you need to leverage. You can load up the Map found in "MountingSystemTutorial Content/Maps" and test out the mounting system.
Reparenting Blueprints Classes
In the folder "MountingSystemTutorial Content/Blueprints/Pawn" You will find the BP_MST_Character blueprint which represents a Rider. You can reparent your own BP Characters to this BP for any rider. This similar approach can be used for the BP_MST_RobotHorse to use as a mount for any blueprint mounts you may want to use.
In the folder "MountingSystemTutorial Content/Blueprints/Player" you will find the BP_MST_PlayerController blueprint which represents the player controller. You can reparent your blueprint Player Controllers to this for any player you wish to have the ability to perform mounting. It is important to note that this PlayerController leverages the Basic Interaciton System and so you will need to modify the Blueprint if you are using your own interaction system.
Reparenting to C++ Classes
If you are using a base C++ class you want to leverage for your Characters or Mounts then you can look in "MountingSystemTutorialCore Content/Blueprints/Pawn" and find BP_MST_CharacterBase. This is the base class to BP_MST_RiderCharacter which implements the Rider Components and Interface's, and the BP_MST_MountCharacter which implements the Mount Components and Interfaces .
The BP_MST_CharacterBase simply sets up Input for the Rider and Mount subclasses. If you have no input scheme yet then you can parent Rider and Mount to this class. If you have input already established then you can reparent the BP_MST_RiderCharacter and BP_MST_MountCharacter to your own custom C++ versions with input specified for them.
For the Player Controller if you do not have an input system specified you can go to the folder "MountingSystemTutorialCore Content/Bluepritns/Player" and reparent the BP_MST_PlayerControllerBase class to your base C++ PlayerController class.
If you already have a control scheme then you can go to "MountingSystemTutorial Content/Bluepritns/Pawn" and reparent the BP_MST_PlayerController blueprint to your C++ PlayerController instead.
Option 2 - Minimalist Blueprint
If you are looking for basic Blueprint implementation of the mounting system with no interaciton system involved then this is where you will want to begin. This is slighly more advanced because this migration assumes you have some form of game already setup in blueprints.
Go to the Demo Project and find the folder Plugins/Tutorials and copy both the MountingSystemTutorialCore plugin. Copy this plugin into your projects Plugins Folder. Feel free to create any subfolders you need. This plugin forms the core implementation of the mounting system with no Game assets assigned to the various classes. It provides a good
Go to your projects root folder and right click on the .uproject and select "Generate Visual Studio Project Files"
Reparenting Blueprints Classes
In the folder "MountingSystemTutorial Content/Blueprints/Pawn" You will find the BP_MST_Character blueprint which represents a Rider. You can reparent your own BP Characters to this BP for any rider. This similar approach can be used for the BP_MST_RobotHorse to use as a mount for any blueprint mounts you may want to use.
In the folder "MountingSystemTutorial Content/Blueprints/Player" you will find the BP_MST_PlayerController blueprint which represents the player controller. You can reparent your blueprint Player Controllers to this for any player you wish to have the ability to perform mounting. It is important to note that this PlayerController leverages the Basic Interaciton System and so you will need to modify the Blueprint if you are using your own interaction system.
Reparenting Blueprints
For Characters you can look in "MountingSystemTutorialCore Content/Blueprints/Pawn" and find BP_MST_CharacterBase. This is the base class to BP_MST_RiderCharacter which implements the Rider Components and Interface's, and the BP_MST_MountCharacter which implements the Mount Components and Interfaces .
Your child Blueprint Riders and Mounts can be reparented to the BP_MST_RiderCharacter or BP_MST_MountCharacter class respectively. You will need to define the seats for your mounts individually.
If you have a parent C++ class for your Characters then you can reparent these blueprints to those Character Classes. The BP_MST_CharacterBase simply sets up Input for the Rider and Mount subclasses. If you have no input scheme yet then you can parent Blueprint Rider and Mount classes to this class. If you have input already established then you can reparent the BP_MST_RiderCharacter and BP_MST_MountCharacter to your own custom C++ versions with input specified for them.
For the Player Controller you can go to the folder "MountingSystemTutorialCore Content/Bluepritns/Player" and reparent your player controller to the BP_MST_PlayerControllerBase. Additonally if you have a C++ Player Controller you can reparent the BP_MST_PlayerControllerBase class to your C++ PlayerController class.
Reverting Back to a Blueprint Only Project
If you have converted your project from a Blueprint Project to a C++ project and for some strange reason you want to bring it back to a Blueprint Only Project you can do this with a few tweeks. The process involves moving the Content Folders of the Plugins into your Projects Main Content Folder first so that you can continue to use it with out the Plugins.
Move Plugin Content to your Content Folders
First open the editor. When the editor is loaded find the Plugin Folders for the MSTC Content and MST Content.
Copy the MSTC Content Folders into your projects primary Content Folder. You can create subfolders or a whole new directory, it does not really matter where you put it so long as it is in the root folder of your project's Content Directory.
If you are also planning on using the content from the MST plugin, Do the same for the MST Content Folder.
Once Both MSTC and MST have been moved. Right click on the now empty-ish MSTC folder and select "Fixup Redirectors".
Do the same for the MST content folder.
Do the same for the Project Content Folder.
Edit the UProject File
Go to your projects main directory. Right click on your projects .uproject file and open it up in any editor such as Notepad++.
The file is in JSON format. Delete eh entire block for "Modules" and save it.
Delete the Source and Plugins Folders.
You should now be able to open your project again with out compiling code.
